Hosting your images online
There are a number of sites where you can host your images online for FREE. We have used photobucket as an example but you can use any website (including your own website if you have one) or any image hosting site that will allow you to save your image and provide a link that can be used to display the image.
Sizing images and image type
Before uploading your images you need to ensure that they are a suitable size and type to suit where they will be used. There are a lot of image editing programs available that allow you to crop and size images and save them into various format types. Most computers have suitable programs included such as Paint on PC´s or iPhoto for Mac´s. Also a wide range of graphic programs can either be downloaded for free or as as a free trial. In addition you can also get this done for you. If you need help you can try www.Art-Seekers.com and submit a request who can help you for a small fee or even create a custom image for you if required. An alternative is to find someone on Fiverr.com where you can find someone to do tasks like this for $5.00.
Images type jpg or png
Two image format types can be used for either story / chapter images or for adverts. These are Jpg or png which are the most common image types using on the Internet.
Sizing images for adverts
If the image will be used as an advert it needs to be sized to fit into your advert area to display the image correctly. For images to be used in your advert area the maximum width is 315 pixels and the maximum height is 400 pixels. If you do not wish to fill your the entire advert area with the image you can reduce the image size to match your layout requirements. Please note as layout formatting can vary on different browsers we suggest adding any text to your image and sizing your image fit into your advert space.
Sizing images for stories
For story images we recommened the maximum size (height or width) is about 640 pixels. If your image is higher than it is wide set the height to 640 pixels or if it is wider than it is high set the width to 640 pixels.
How to upload images to photobucket
Step 1
If you do not currently have a photobucket account click here to set up a free account.

Click on the Sign Up For Free button.
Step 2
Complete the registration form shown below and follow the instructions to set up your account and log in.
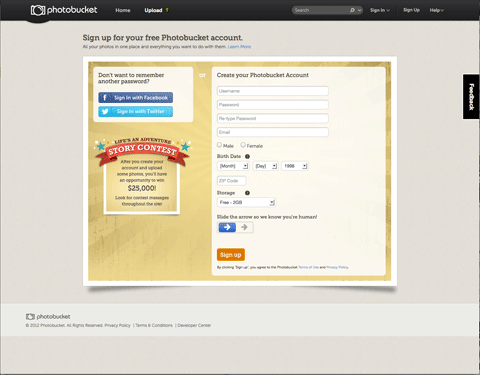
Complete the registration form.
Step 3
After logging in, click on the Upload menu item.
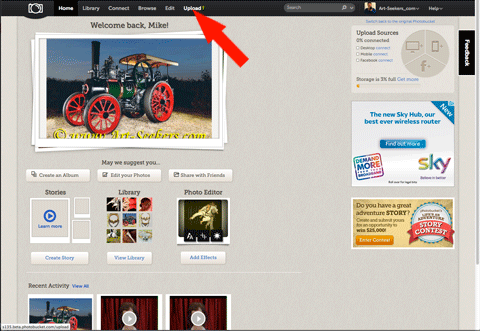
After logging in select the Upload menu option shown.
Step 4
Click on the Browse Files button or drag and drop your image(s) on to the drop zone.
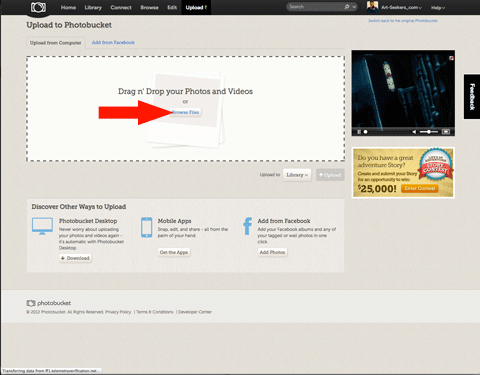
Browse for files or drag and drop.
Step 5
Click on Libary or select the album you saved your images.
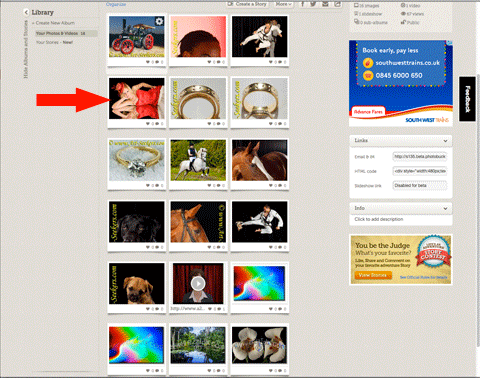
Click on the image you wish to use.
Step 6
Click in the Direct link text area (This will normally copy to your clipboard automatically).
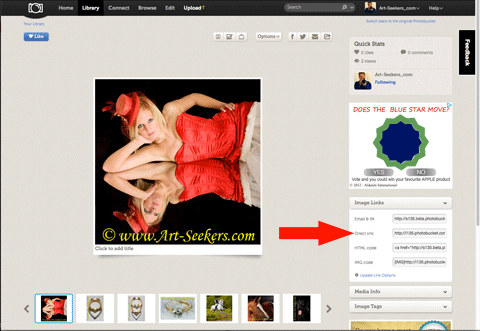
Copy the direct link.
Step 7
Paste the link into the chapters Cover image Url.
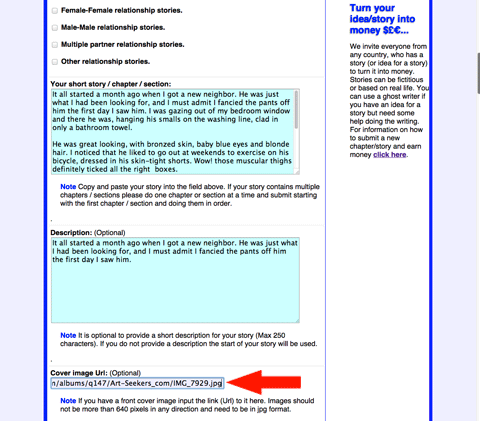
Paste the direct image link into your Cover image Url field for the chapter.


